Seacork deck installation
Summary
Choice of format
Strips or sheets
Surfaces to cover
How to make an evaluation
Cutting the cork
Sheets
Curved strips
Preparing the deck
Wood
Steel or aluminum
Plactic
Tools
Tracing the symetrical axis
Dimensions of the cork
Virgin sheets
Grooved sheets
Getting best results with caulking
Drying
Sanding
Finishing
Our replies to frequently asked questions
How to fit on a bath platform
How to fit on a catamaran
– In English pdf file
– In German pdf file
Choice of format
Plank (strips, board, lath) or sheets
Curved plank for sailing boat need to be done with individual stripes. Standard size is 47 mm width, but other sizes are available as 73 mm, 100 mm and 125 mm.
For a cockpit of sailing boat, open, catamaran or motor-yacht, you can use grooved sheets (width of plank as above).
Thickness
How to decide whether 6mm, 8mm or 12mm is right for your project? Although certainly thicker cork sheets will give you greater longevity, particularly if you plan to sand/repair it often (most hardly ever do). Thicker cork will give a little more cushion underfoot. Thinner cork will follow contours more closely, and save you some money. 6mm or 8mm are the most common choices.
Calculating the surfaces
Trapezoids or triangles will usually increase the amount of wasted cork. You have to keep this in mind when calculating. You must also count on extra sheets for the edges
Oddly shaped areas will have to be cut from virgin sheets.
We very strongly urge you to add at least 10cm to all your calculation for the frame around hatches
The add a further 10% for waste.
An example of calculation
Think of trapezoids as rectangles to make things less complicated.
For a cockpit, a pool surround or a passage-way, calculate the maximum length by the maximum width.
For a triangular bow, take the depth between the roof and the prow and multiply by one half the width at the roof, then add 20% or 30% depending on the curvature of the boat.
The cutting of the sheets or the strips
By Sheets
Cutting squares is straightforward, except sometimes for the gangways where the space is very narrow.
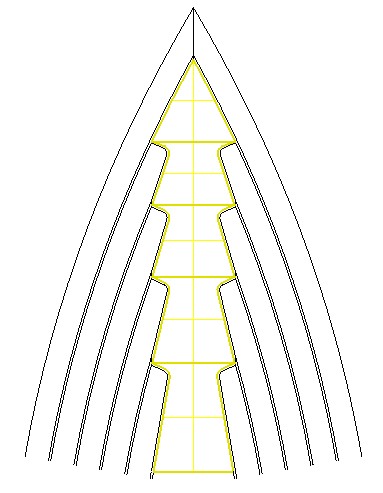
Laying down sheets starts at the central axis. To understand better how to proceed, the drawings below do not take this into account.
Figures below:

Fig. 1 : Two imaginary lines, called “cutting lines” fictives lignes , called “lignes de coupe”, roughly 3 cm from the outside and inside edges enable a pré-cutting of the sheets.

Fig. 2 :
Remove the cuttings which can be used elsewhere and is Fig. 4. The idea is to cover the surface while minimizing waste.

Fig. 3 : After gluing the pre-cut sheets, placing a plank on top of the sheets, then draw the cutting line.
After glue them to the surface taking great care to follow the edges, without following any structural defects
and leaving the thickness of a joint.
The trick is to take a cutting from a square a strip with two adjacent scoring, to trace against a vertical wall or a strip for the exterior tracings.
Ensure that the tracings do not have any ugly waves caused by irregularities of the walls. Do this with a flexible wooden rod or something similar. Afterwards, you do the actual cuttings,
as cleanly as possible.
The angle of the cutter is important. You have to cut the cork without tearing it.

Fig. 4 : how to use pieces of sheet after cutting. And do as before on fig. 1 to 3
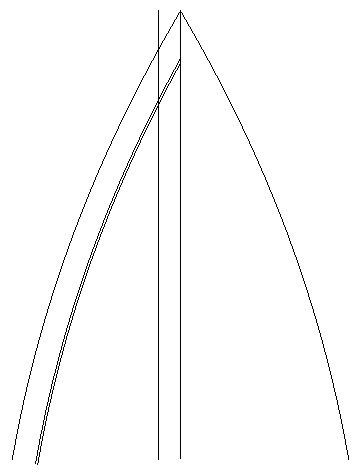
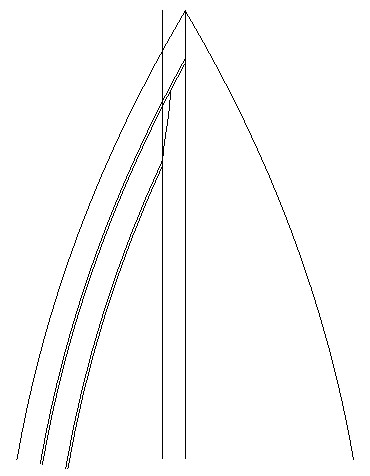
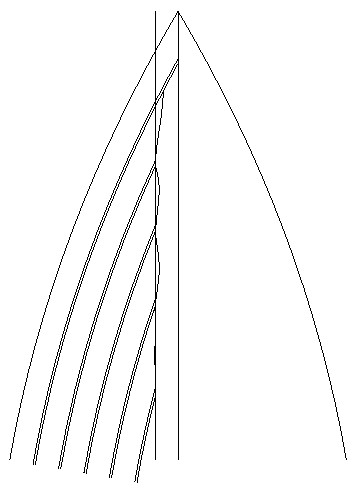
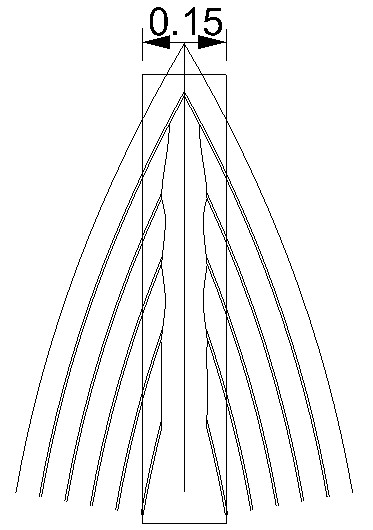
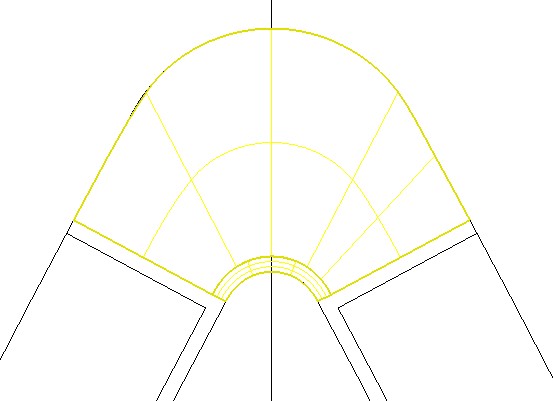
Curves strips
Laying down a sheet to fit curves is just the opposite of laying down squares: you start from the edge and not from the centre.
After having glued the border sheet, paying special attention to how well it fits the boat’s curve, you can fill the remaining surface while keeping the other sheets held together with
masking tape.
Take special care to clean up any adhesive that oozes from the scoring. They will cause trouble when you get the the caulking stage.
Only the last sheet will be cut to fill the remaining surface to be covered. The procedure is the same as above.
It goes without saying that the surface, on which the cork will be glued, has to be carefully prepared. Any irregularity will show through. Also, the surface must be compatible with the
glue you are using.
poselames01
poselames02

poselames03
poselames04
poselames05

poselames06
poselames07
poselames08
Don’t overlook the paragraph describing the tools you will need for tracing the boat’s axis and for laying down the cork.
Cutting the cork is, perhaps, the most important aspect of the job. We provide all the information you will need for a deck, a cockpit, a fly-bridge, a pool surround, a passage, and
so forth
Once you have done the cutting, move on to the gluing with as little delay as possible. The cork itself, before gluing, is extremely temperature sensitive. It can easily lose a few
millimeters. The “lost” cork can be recovered because of its inherent elasticity but this can be tricky.
After the gluing, and after a thorough cleaning of the cork to get rid of any traces of glue or anything else that might have got into the scoring. You are then ready to caulk the scoring.
This is usually done with a black substance but it has a defect, namely to store heat.
The sanding should wait a further two or three days. However, if you lay down the cork in phases because of the weather, it is best to do the sanding only once for the entire job. This
avoids the risk of different colours caused by ultra violet sun rays.
You have to choose between leaving the natural cork colour or using some coating that will make the cork easier to keep clean. Either way the original colour will fade, just as with
wood.
This will not affect the cork’s anti-slip properties.
Preparation of the surface
This paragraph is very significant even if one too often tends to be unaware of it.
On a surface clean and absent from all significant deformations one will take account only of one preparation with the fixing of the binder.
Indeed all surfaces require a minimum of preparation.
Wood:
Check the entire surface, to ensure that no part of it will require restoration in the foreseeable future.
We recommend sanding if any kind of paint or varnish is present.
Steel:
As for wood, inspect carefully for problems like rust or deformations. The latter are frequently present near the railings.
A surface “re-aggregation” may be needed. Check with whoever sells resins in your town to make sure you choose the most appropriate product.
You may have to coat the surface with a primer.
Aluminium: Idem steel.
Fibreglass boat: On this type of boat the minimum necessary is to carry out a degreasing, thawing of ice with spirit ethylated after having slightly to sandpaper surface to be covered.
ATTENTION: The Quality of the final result will depend on the preparation which you will have carries out, if need be, of surface to be covered.
TOOLS
The tools you will need are fairly commonplace but extremely useful and, often, indispensable.
- A pen or pencil that makes a wide marking
- An instrument to measure angles, especially right angles
- A high-quality cutter, preferably with an adjustable blade
- Sander and/or orbital grinder
- Sandpaper grain 80 and 120
- A square, toothed spatula, 2 à 4 mm depending on the surface, for gluing
- Ruler 1m
- A flexible wooden rod for tracing curves
- Masking tape
- A small wooden or plywood board
For caulking
- A high quality cartridge pistol, either pneumatic or electric
- A knife to cut resin
- Disposable latex gloves
For the completion
- A brush of good size or a roller for varnish
- A container for paint
- Masking tape
- Disposable latex gloves
- Rags to get rid of any excess liquid. Some of the useful liquids are hard to remove once
they have dried.
Tracing the axis
Tracing the boat’s axis accurately determines the boat’s symmetry. It is the only tracing that
is absolutely necessary for getting a good result on the deck.
Measurements of the cork we supply
Plank of 47, 73, 100, 125 mm x 2 m x 6, 8 or 12 mm which minimise waste when cutting to the exact curve of a deck.
Sheets for different uses such as especially large widths, unusual shapes, very small surfaces with a fern motif, such as “compass rose” etc.
In sheets of 0.5 m x 1 m x 4 mm thick or 0.5 m x 2 m x 6, 8, 12 mm thick.
Grooved sheets. Widths of 47, 73, 100, 125 mm.
Pre-caulked Sheets are available with the same width and thickness dimensions but, is specially ordered, joined together in sheets up to 14 m in length.
You can opt for a virtually unlimited number of designs on squares of 0.5 m x 2 m x 6, 8, 12 mm.
Filling the caulking
- Use cartridges with large diameter ducts that are cut perpendicularly.
- Hold the pistol as vertically as possible and push the joint to ensure that the groove is completely full.
- Spread the joint with a spatula taking care to fill the caulking completely. Best to remove the masking tape as soon as you have done this.
Consumption Around two cartridges of 290 ml/ m²
Drying
Once the caulking is done, wait two or three days before sanding.
Sanding
- Do not start sanding until the caulking is thoroughly dry.
- The drying time depends on the ambient temperature and humidity. The higher the temperature and the humidity, the faster the drying.
- Use a orbital sander. Start with a 40 or 50 grain, then use an 80 or 100 grain for finishing.
- When restoring a discoloured deck, start with a 50 grain and finish with an 80 or 100 grain.
- After sanding, impregnating the cork with cork coat will facilitate cleaning.
- For certain surfaces – especially very big ones – you can use a band sander but you must take great care not to leave it for more than an instant in the same place.
- A band sander is extremely hard to handle when one is kneeling, especially on the deck of a boat in the water.
- or even a vibrating sander.
In all cases your arm should always be in motion, fore and aft, right or left, or in a circular
movement.
*Be careful if you want to use belt-sander. It’s not easy to use it when kneeling on a deck.
Finishing
You can opt for a natural or a saturated finish.
A natural finish is all about appearance. It is problematic to some extent because cork, like all wood, discolours on the surface when exposed to sunlight. It can even take on a greyish tint.
Your deck will be much easier to clean if you apply Cork Coat after sanding. It impregnate the cork without diminishing any of its natural qualities, especially for preventing people from slipping.
A Cork Coat actually enhances the natural colour of cork. It will not prevent whitening in sunlight but it will slow down the process and it will prevent greying. Cork Coat do not peel or crackle.
Before applying the Cork Coat, ensure that the deck is free of dust and that all spots are removed.
For best results, apply the Cork Coat and, 15 minutes later, wipe away any excess with a rag to prevent creating a slippery spot.
Count on one litre of Cork Coat for eight to ten square meters of deck.
Upkeep
After two or three years, you can do another sanding with 80 grains and then saturate again. You can wait longer, even much longer, before doing this, depending on how your deck has weathered.
Application with a brush or roller.
Between 5°C et 35°C with a humidity factor below 20%.
Allow 24 to 48 hours for drying
Clean with water.
Frequently asked questions (FAQs)
Q. Is it better to use planks or sheets for a poop deck?
R. It depends. For a bath plateform deck I would recommend sheets, placed on the longitudinal axis of the boat. You can achieve a more precise with plank to make a perimeter. In other cases, for example, when there are round corners with big dimensions, only sheets will do for the width and they must be without scoring.
Q. Can one use sheets or plank for a deck of any length?
R. The simple answer is “yes”. You can place either plank or sheets one after another
indefinitely.